ИГРУШКИ ИЗ НИТОК
ИСТОЧНИК

читать дальше

вариант
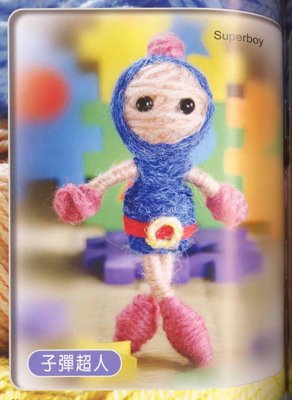
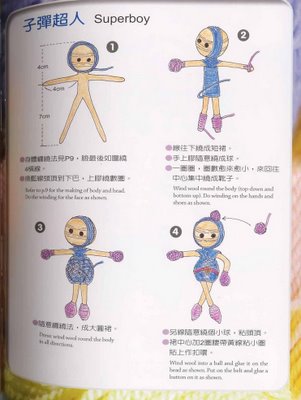
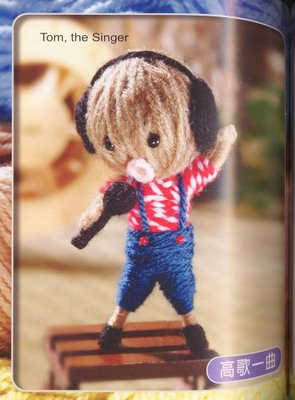
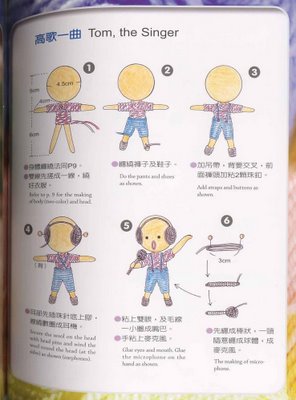
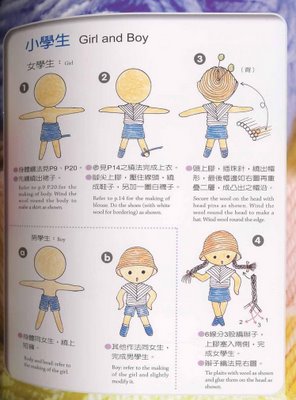
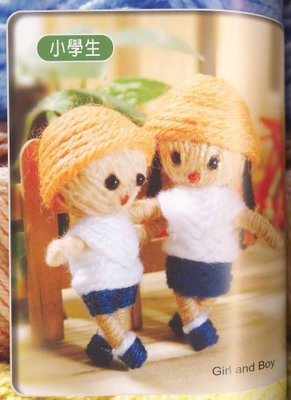
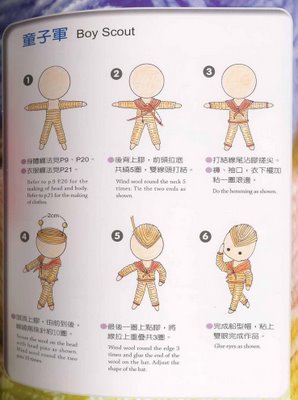
Такую очаровательную куклу можно подарить как подарок или сувенир.

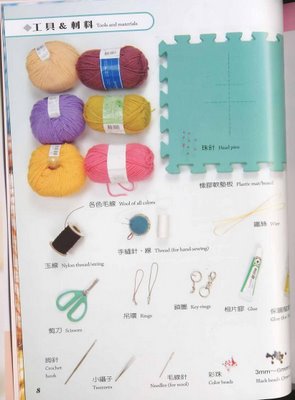
Нам понадобится: вязальные нитки, шерстяная ткань различных цветов, клей, маркер, тесьма, пуговицы, ножницы.
craftstylish.com/item/27585/how-to-make-yarn-an...
love making these embellished yarn dolls! They're a great project for using up precious bits of yarn, felt, ribbon, and rickrack. And they're great fun to make with kids as young as 8—as long as an adult helps with the hot-glue gun. (I prefer hot glue for this project because it sets up very quickly. If you like, you can also use white craft glue, but keep in mind that you'll have to wait much longer for the glue to set.)
What you'll need:
- Ball of worsted-weight wool or acrylic yarn
- 4-inch x 6-inch postcard
- Scissors
- Wool or acrylic felt in assorted colors
- Hot-glue gun
- Hand-sewing needle and thread
- Fine-point Sharpies
- Craft glue (optional)
- Embellishments, such as buttons, ribbon, and rickrack
 | Wrap the yarn around the 6-inch side of the postcard. |
Make the Yarn Doll
I like to use a 4-inch x 6-inch postcard to wind the yarn for my yarn dolls. If you don't have one of these handy, just cut a piece of heavyweight cardstock to that size.
Begin by winding yarn around the 6-inch side of the postcard. The end of the yarn should be at the bottom of the postcard, as shown. Wind the yarn around the postcard about 75 times, forming a nice, thick coil. Don’t wrap too tightly—you’ll want to be able to pull this coil off in a moment! Cut the yarn at the end of the last wrap.
 | Tie the coil of yarn at the top. |
Carefully slide this coil of yarn off the cardstock. Cut a 12-inch piece of yarn, and slip it through the middle of the coil. Tie the ends in a tight double knot.
 | Tie tightly around the coil to form the doll's neck. |
Cut another 12-inch piece of yarn, and tie this tightly to form the doll’s neck. (Each time you tie yarn in making your doll, use a tight double knot.)
Make the head slightly smaller than you think it should be—when we add a face and hair later, they'll increase the size of the head. Leave the ends of the piece you used to tie the neck intact, and just let them become part of the doll’s body. Set the body aside for a moment.
 | Make arms by wrapping yarn around the 4-inch side of the postcard. Tie both ends. |
Now, make some arms. Wrap the yarn about 18 times around the 4-inch side of the postcard. Pull this small coil carefully off the cardstock. Cut two 6-inch pieces of yarn, and tie these tightly around each end of this coil, forming your doll’s hands.
 | Put the arm piece through the center of the body. |
Take the doll body, and divide the yarn so that the center of the remaining coil is open. Insert the arm piece through the center of the body, as shown.
 | Tie around the body, just under the arms. |
Cut another medium-long piece of yarn, and tie it tightly around the body, right under the arms, to make the doll’s waist.
 | To make legs, divide the yarn into two halves and tie around each one. |
Cut all the remaining loops at the bottom of the doll. If you want your doll to have legs, then split the stands of yarn into two halves. Tie each one tightly at the bottom to form the doll’s ankles. Then, clip the loops at the doll's hands, and trim the hands and feet to a nice pom-pom shape.
If you want your doll to wear a skirt, then simply trim all the strands of yarn at the bottom of the doll to the same length.
 | Download the face pattern. Pin it to some felt and cut it out. |
Add a Face and Hair
Download the pattern sheet and cut out the pattern for the face. Pin this to some felt of your choice and cut it out. (Be sure to cut the two slits in the top, too.)
 | Glue the edges of the felt to the head. |
Apply a little hot glue to the two side edges of the face piece, then wrap it around the head. Don't apply any glue to the center of the felt because it can soak through and leave indelible marks on your doll's face.
 | Glue the top edges of the felt to the head. |
Apply a little more glue along the top edges of the felt and press them down to the head. Those slits you cut in the top edge will help the felt wrap more cleanly over the head. You'll be covering this edge with a wig shortly.
 | Wrap more yarn to make a wig. |
Now to make that wig! Wind some yarn around the 4-inch side of the postcard, about 30 times. Tie this coil tightly at one end, and cut the loops at the other end.
 | Spread the yarn out in all directions. |
Lay the wig out on a work surface and use your fingers to spread out the strands evenly in all directions.
 | Glue the wig to the top of the doll's head. |
Place a dollop of hot glue on the top of the doll's head. Press the center of the wig into the glue. Then, arrange the strands of hair so they fall all around the head.
Designate a series of these strands to be bangs. Push the rest of the hair back out of your way for a moment.
 | Cut the bangs. Apply a little glue under them and press them to the forehead. |
Trim those bangs to about 1/2 inch in length. Then, put a little glue on the forehead and press the bangs gently into it. This helps them lie flat against the face—and it covers up the edges of the felt.
Repeat this process on the sides and back of the doll's head: Apply a little glue to the head, and gently press the hair into it.
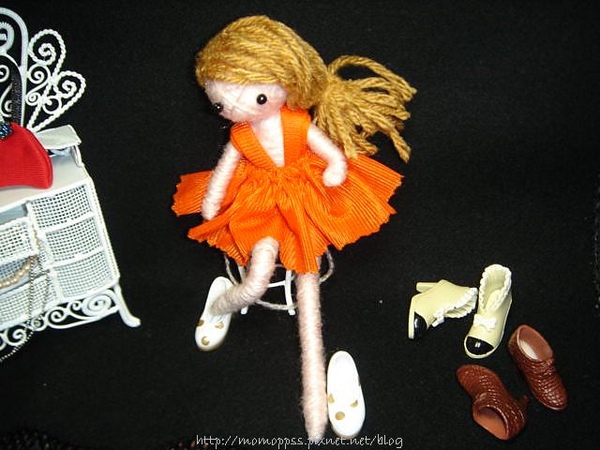
From there, you can give your doll any hairstyle you like! Cut it short, make braids, make a ponytail, make pigails—this part is highly addictive. Take a look at the sample dolls at the top of this post for some ideas.
 | Draw on a face with fine-point markers. |
When you have the hair as you like it, draw a simple face with fine-point Sharpies. (Or, if you're handy with embroidery, you could, of course, embroider a face for your doll. Just do the embroidery on the felt before you glue it to the head.)
 | Download the clothing patterns. Pin to felt and cut out. |
Dress Your Doll
The downloadable pattern sheet has lots of components to make interesting outfits for your dolls. Take a look at the sample dolls for inspiration, and here are a few tips:
• You can embellish the clothes with ribbon, rickrack, or embroidery. You can also sew on beads, buttons, or sequins. If you decide to embellish, it's easiest to do that before you attach the clothing to the doll.
• You can attach the clothing pieces to the doll with hot glue, or you can sew them together, using a tiny whipstitch. Just wrap the pieces around the body, overlap the edges, and sew or glue them to secure.
 | The pattern pieces mix and match to create lots of doll outfits. |
• If you make an outfit with sleeves or pant legs, attach these to the doll first, and then add one of the blouse pieces over them.
• The two blouse pieces and the collar piece are designed to be worn with the opening either in the front or back, giving you lots more design options.
• Feel free to alter these patterns any way you like! You can add a scalloped edge to the apron, for example, or cut a pinked edge into the pant legs.
http://images.taunton.com/downloads/cs/Yarn_Felt_Folks_Tutorial.pdf

picasaweb.google.com/aleyarrito
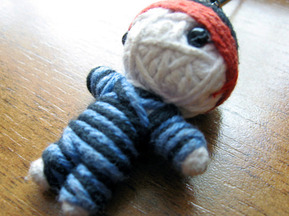
нитяные барби
http://momoppss.pixnet.net/album
http://books.tr200.ru/v.php?p=26&t=24&id=167500

Птички
http://stranamasterov.ru/node/38692?tid=451
Аппликация из веревок на жестких формах
http://iskusniza.ru/applikatsiya-masterskaya/nastennoe-ukrashenie-sova.html


Ю-Ко
вот тут её можно скачать с разных обменников. Осторожно! Вылезает реклама с порнухой!
Вот ещё ссылки на форумы
http://www.danilova.ru/phpbb/viewtopic.php?f=188&t=4168&start=0
http://igrushka.kz/phpBB2/viewtopic.php?t=4683&view=next
http://www.kengurenok.ru/needlework/furtree_toy/
http://warnet.ws/news/6862/comments/
@темы: инструктаж, create, куклы