Introduction
This was one of my very first amigurumi pattterns, inspired by my love of dragons, and a result of my not being able to find an easy pattern for a small crocheted dragon.
This pattern is also one of my most popular, and I am delighted to find it is still going strong. There are baby dragons all over the world now, with my pattern translated into french, german and who knows what other languages! I originally posted it on Crochetville.org.
Materials List
Bulky yarn (I used Bernat Softee Chunky for my baby snow dragon) But reall, any yarn can be used for this pattern, just adjust your hook size accordingly.
"G" hook
tapestry or darning needle to sew pieces together
stitch markers (or a piece of yarn or thread to mark ends of rounds)
two post eyes or buttons, or for young children, eyes could be embroidered on
fiberfill or stuffing material
Finished Size
Depends on the yarn and hook size used.
Gauge
Not important.
Notes
Abbreviations used:
sc = single crochet
st = stitch
ss = slip stitch
inc = increase (do 2 single crochets in one stitch)
dec = decrease ( insert hook into first stitch, yarn over, pull up a loop, insert hook into the next stitch, yarn over, pull up a loop, yarn over and pull through the two loops on your hook)
The Pattern
Head
As amigurumi is made in spirals, do not join rounds. Use a stitch marker or a piece of thread or yarn to mark the end of your rounds.
Start 6 sc in a magic ring. (6 sc)
Rnd 2: 2 sc (inc) in each st around (12 sc)
Rnd 3 -6 : work even, no inc or dec (12 sc)
Rnd 7: 2 sc (inc) in each of the first 6 st, sc in each of remaining 6 sc (18 sc) (This starts to form the forehead ridge)
Rnd 8: sc in each of the first 8 st, 2 sc (inc) in the next 2 st, sc in the remaining 8 st (20 sc)
Rnd 9 - 11: work even, no inc or dec (20 sc)
Rnd 12: *sc first 2 st together (dec), sc in the next 3 st* repeat from * to * around (16 sc)
Rnd 13:*sc first 2 st together (dec), sc in the next 2 st* repeat from * to * around (12 sc)
Rnd 14: *sc first 2 st together (dec), sc in the next st* repeat from * to * around (8 sc)
ss in next st and fasten off, leaving a long tail for closing and sewing.
BODY
Start 4 sc in a magic ring. (4 sc)
Rnd 2: 2 sc (inc) in each st around (8 sc)
Rnd 3 -5 : work even, no inc or dec (8 sc)
Rnd 6: *1 sc in first st, 2 sc (inc) in second st* repeat from * to * around. (12 sc)
Rnd 7 - 8: work even, no inc or dec (12 sc)
Rnd 9: *1 sc in first 2 st, 2 sc (inc) in third st* repeat from * to * around. (16 sc)
Rnd 10:*1 sc in first 3 st, 2 sc (inc) in fourth st* repeat from * to * around. (20 sc)
Rnd 11: *1 sc in first 4 st, 2 sc (inc) in fifth st* repeat from * to * around. (24 sc)
Rnd 12: *1 sc in first 5 st, 2 sc (inc) in sixth st* repeat from * to * around. (28 sc)
Rnd 13 - 16: work even, no inc or dec (28 sc)
Rnd 17: *sc first 2 st together (dec), sc in the next 5 st* repeat from * to * around ( 24 sc)
Rnd 18: *sc first 2 st together (dec), sc in the next 4 st* repeat from * to * around ( 20 sc)
Rnd 19:*sc first 2 st together (dec), sc in the next 3 st* repeat from * to * around ( 16 sc)
Rnd 20: *sc first 2 st together (dec), sc in the next 2 st* repeat from * to * around ( 12 sc)
Rnd 21: *sc first 2 st together (dec)* repeat from * to * around. (6 sc) ss in next st and fasten off, leaving a long tail for closing and sewing.
TAIL
Start 3 sc in a magic ring (3 sc)
Rnd 2: 2 sc (inc) in each st around (6 sc)
Rnd 3: work even, no inc or dec (6 sc)
Rnd 4: *1 sc in first st, 2 sc (inc) in second st* repeat from * to * around. (9 sc)
Rnd 5: work even, no inc or dec (9 sc)
Rnd 6: *1 sc in first 2 st, 2 sc (inc) in second st* repeat from * to * around. (12 sc)
Rnd 7: work even, no inc or dec (12 sc)
Rnd 8: *1 sc in first 3 st, 2 sc (inc) in second st* repeat from * to * around. (15 sc)
Rnd 9: work even, no inc or dec (15 sc)
Rnd 10: *1 sc in first 4 st, 2 sc (inc) in second st* repeat from * to * around. (18 sc)
Rnd 11: work even, no inc or dec (18 sc)
Rnd 12: *1 sc in first 5 st, 2 sc (inc) in second st* repeat from * to * around. (21 sc)
Rnd 13 - 15: work even, no inc or dec (21 sc) At the end of rnd 15, ss in next st and fasten off, leaving a long tail for sewing.
FEET (Make 2)
Start 4 sc in a magic ring. (4 sc)
Rnd 2: 2 sc (inc) in each st around (8 sc)
Rnd 3: *1 sc in first st, 2 sc (inc) in second st* repeat from * to * around. (12 sc)
Rnd 4 - 6: work even, no inc or dec (12 sc)
Rnd 7: *sc first 2 st together (dec), sc in the next st* repeat from * to * around (8 sc)
Rnd 8: work even, no inc or dec. (8 sc) ss in next st, and fasten off, leaving a long tail for closing and sewing.
ARMS (Make 2)
Start 6 sc in a magic ring. (6 sc)
Rnd 2 - 6: work even, no inc or dec (6 sc)
Rnd 7: *1 sc in first 2 st, 2 sc (inc) in second st* repeat from * to * around. (8 sc)
Rnd 8 - 9: work even, no inc or dec (8 sc)
Rnd 10: *sc first 2 st together (dec), sc in the next 2 st* repeat from * to * around (6 sc) ss in next st and fasten off, leaving a long tail for sewing.
EARS AND SPINES (Make 5)
Start 4 sc in a magic ring. (4 sc)
Rnd 2: *1 sc in first st, 2 sc (inc) in second st* repeat from * to * around. (6 sc)
Rnd 3: *1 sc in first 2 st, 2 sc (inc) in second st* repeat from * to * around. (8 sc)
Rnd 4: *1 sc in first 3 st, 2 sc (inc) in second st* repeat from * to * around. (10 sc)
Rnd 5: work even, no inc or dec (10 sc) ss in next st, and fasten off, leaving a long tail for closing and sewing.
Weave long tail through the last row of two of these pieces and gather, these are the ears.
The other 3 pieces fold flat (to look like a triangle) and are sewn on the back for the spines.
EYELIDS (Make 2)
6 sc in a magic ring. This is the exception to working in spirals. At the end of this round, chain one, and turn
Rnd 2: sc in each st around (6 sc)
Fasten off, leaving a long tail for sewing
ASSEMBLY DIRECTIONS:
It's easiest for me to pin my body parts into place before sewing them, to make sure they're balanced and in the correct position.
Sew eye lids into place on the head, then attach eyes. Stuff head, and weave yarn through last row of stitches in the back of the head, gathering to close. (I run the yarn down the back of the head to use to sew the head to the neck) Set aside.
Stuff body and neck. Weave yarn through last row of stitches on the bottom of the body, gathering to close. Fasten off, and weave in end.
Stuff feet, and weave yarn though the last row of stitches to gather closed. Use remaining yarn to attach feet to the bottom of the body.
Stuff tail, position on the back of the body, and sew into place.
Stuff only the bottom of the arms, and sew into place on the body. (I positioned them folded across the belly of my dragon to pose him, and sewed them into place.)
Sew head onto body. Position ears on head and sew into place.
Sew spines in a line down the back of the dragon.
A good tutorial for making a magic ring can be found here:
crochetme.com/Dec_Jan_0405/reads_round.html
If you're not comfortable with using a magic ring, you can also start with the traditional method (chain two and work appropriate numbers of sc into second chain from the hook) but I find it leaves too big a hole for my tastes.
Tutorial on assembly can be found here:
www.quizilla.com/users/MarjorieCrochets/journal...
Enjoy your baby dragon!
www.angelfire.com/pa/ChloesCorner/MarjorieCroch...
Baby Snow Dragon Tutorial - The Finished Dragon
My baby dragon is finally finished. I've decided hat the little one is a girl, and she says her name is "Hope". 

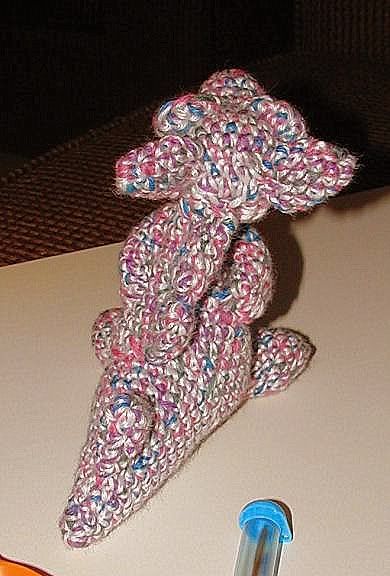 Hope and I 'hope' you've found this tutorial helpful in designing and making your own baby dragons. Please remember that each dragon is different, and can easily be changed by adding extra spines, or sewing the body parts in different positions, as in my sleeping baby dragons, or by adding buttons or jewels, as in my Treasure Dragons. Please drop me a line if you have any other questions or comments. And enjoy your baby dragon always!


 Hope and I 'hope' you've found this tutorial helpful in designing and making your own baby dragons. Please remember that each dragon is different, and can easily be changed by adding extra spines, or sewing the body parts in different positions, as in my sleeping baby dragons, or by adding buttons or jewels, as in my Treasure Dragons. Please drop me a line if you have any other questions or comments. And enjoy your baby dragon always!
Baby Snow Dragon Tutorial - Step Eight
Finally, we're ready to pose our baby dragon. Sometimes I can tell right from the start what personality the little dragon has. This one seemed a bit sad to me, and I really don't want an unhappy baby dragon. I'm going to try several different poses to see if I can change it. I use straight pins to try the different poses. This one looks pensive to me. Not bad, but not what this baby is saying to me.

This one looks like the poor thing has either a headache or tummyache:

This pose isn't bad, but still not right for this dragon:
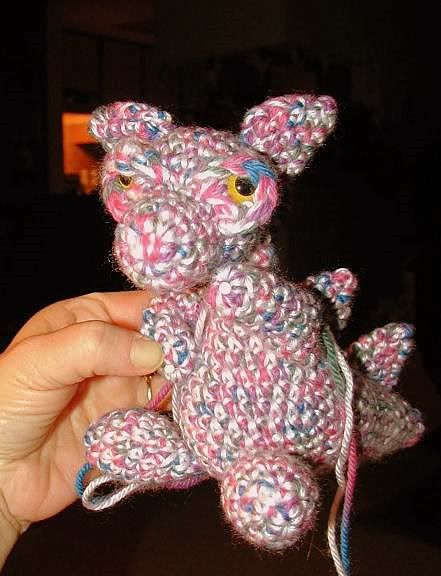
I like THIS! She looks hopeful here. This is the pose I'm going to go with.

Here you can see how I run the yarn up through the center of the arm prior to sewing the arms into place:
I used the yarn from the other arm to sew the two spines on the back into place to pose the head into place.
My baby dragon is done!

This one looks like the poor thing has either a headache or tummyache:

This pose isn't bad, but still not right for this dragon:

I like THIS! She looks hopeful here. This is the pose I'm going to go with.

Here you can see how I run the yarn up through the center of the arm prior to sewing the arms into place:

I used the yarn from the other arm to sew the two spines on the back into place to pose the head into place.
My baby dragon is done!
Placing the spines: I always look at the dragon from the side and the back, before deciding where to place the spines.
For this little dragon, I decided to place the first spine where it would cover the clumsy stitching I did on the neck:
I know you can't see it in the photo, and I apologize for that. My batteries started to die at this point,
so I had to ration my photo's. I'm sewing the first spine in this photo:

Another thing I watch for when placing and sewing the spines in place is to follow the line of the head and neck.
This little dragon has it's head slightly twisted to the right,
I want to make sure I sew the spine to follow that slight twist:

I space and sew the other two spines in place.
For this little dragon, I decided to place the first spine where it would cover the clumsy stitching I did on the neck:

I know you can't see it in the photo, and I apologize for that. My batteries started to die at this point,
so I had to ration my photo's. I'm sewing the first spine in this photo:

Another thing I watch for when placing and sewing the spines in place is to follow the line of the head and neck.
This little dragon has it's head slightly twisted to the right,
I want to make sure I sew the spine to follow that slight twist:

I space and sew the other two spines in place.
Our little dragon needs to be able to hear the secrets you whisper to him or her, so let's sew on the ears!
The first step I do is to gather the ears into shape by weaving the yarn tails through the last row of stitches:
Here I have it in the shape I like, and I'm ready to sew it onto the head:

I always note the row of stitches, and placement behind the eyes, so that the ears are both even.
Then I sew the ear to the head:

There! Now our little dragon can hear! As you can see, the dragon is beginning to develop more and more of a personality.
But it's not finished yet.

Our next step is to place the spines on the back of the dragon.
The first step I do is to gather the ears into shape by weaving the yarn tails through the last row of stitches:

Here I have it in the shape I like, and I'm ready to sew it onto the head:

I always note the row of stitches, and placement behind the eyes, so that the ears are both even.
Then I sew the ear to the head:

There! Now our little dragon can hear! As you can see, the dragon is beginning to develop more and more of a personality.
But it's not finished yet.

Our next step is to place the spines on the back of the dragon.
Now's the time to prepare the arms for sewing to the body. I stuff only the bottom half of the arms to make it easier to pose them, as shown in this photo:

Next, I decide where I want the arm, and start to sew it into place:
Here you see I have both arms in place. I haven't trimmed the long yarn ends yet as I use these to pose the dragon.
The posing part usually comes as a final step.


Next, I decide where I want the arm, and start to sew it into place:

Here you see I have both arms in place. I haven't trimmed the long yarn ends yet as I use these to pose the dragon.
The posing part usually comes as a final step.

Now I'm ready to sew the feet onto the body. Remembering that the tail and the feet both help balance the body and head of the dragon, I place the feet where I think I want them.

Even though my dragon is looking off to the right, I need to line my feet up with the tail.
Pinning them into place before I sew them helps. Looking at it from the bottom, making sure they are lined up with the tail correctly:
Here's my baby dragon with his head, tail and feet all sewn to his body:
Now all I have to do is sew the arms, ears and spines on, and my baby dragon will be complete!

Even though my dragon is looking off to the right, I need to line my feet up with the tail.
Pinning them into place before I sew them helps. Looking at it from the bottom, making sure they are lined up with the tail correctly:

Here's my baby dragon with his head, tail and feet all sewn to his body:

Now all I have to do is sew the arms, ears and spines on, and my baby dragon will be complete!
Here I have the head and the body stuffed and ready to be sewn together. 
I hold up the body and decide where I want to sew the body to the neck, and where my tail will be:
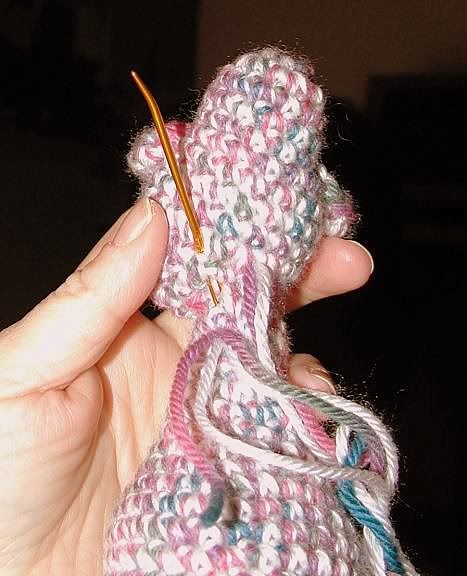
Sometimes I need to flatten the neck a little to sew the head to it. I do this by pressing down with my finger, flattening it.
Then using the same yarn I sewed the head together with, I start sewing the neck to the head: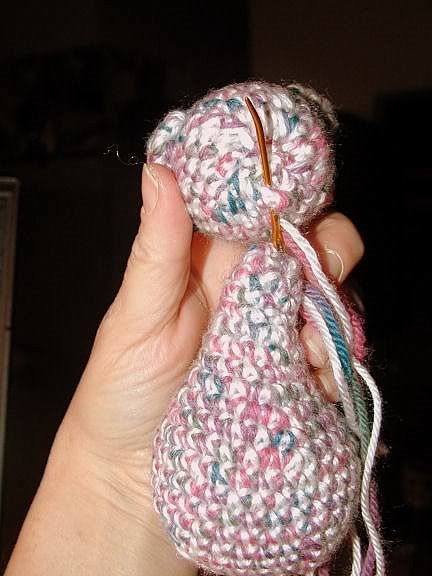
Going around:
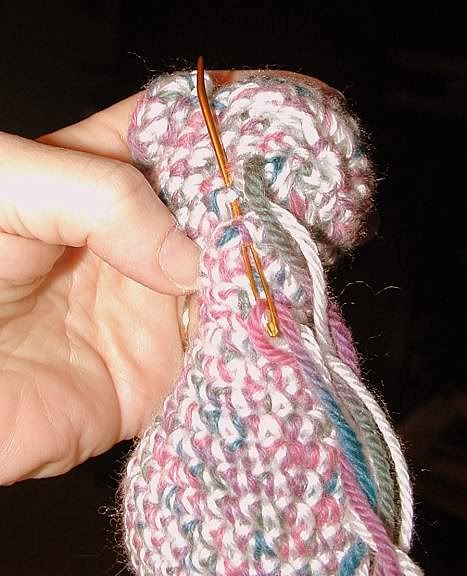
And around the neck and head:
I bury the yarn tails in the center of the head or body, and here we have the head sewn to the body: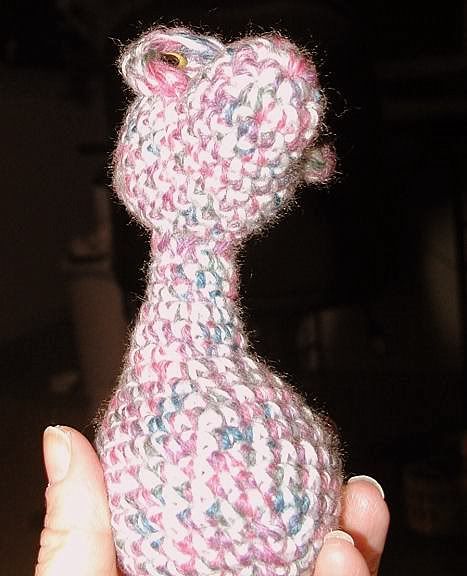
Here's another view of the head sewn to the body.
The stitches seem to blend in pretty well, no matter how clumsy my sewing is: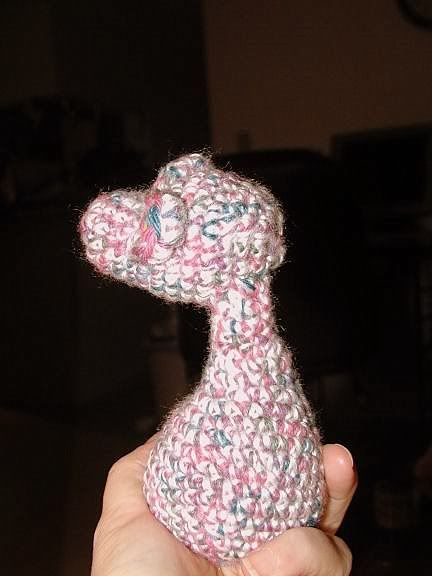

I hold up the body and decide where I want to sew the body to the neck, and where my tail will be:

Sometimes I need to flatten the neck a little to sew the head to it. I do this by pressing down with my finger, flattening it.

Then using the same yarn I sewed the head together with, I start sewing the neck to the head:

Going around:

And around the neck and head:

I bury the yarn tails in the center of the head or body, and here we have the head sewn to the body:

Here's another view of the head sewn to the body.
The stitches seem to blend in pretty well, no matter how clumsy my sewing is:

As promised, a step by step tutorial on how I assemble my crcoheted baby dragons.
Step One: Gather all the body parts.

Step Two: Assembling the head. Before I stuff the head and sew it to the body,
I sew the eyelids into place, and attach the eyeposts. Here I have one eyelid sewn to the head:
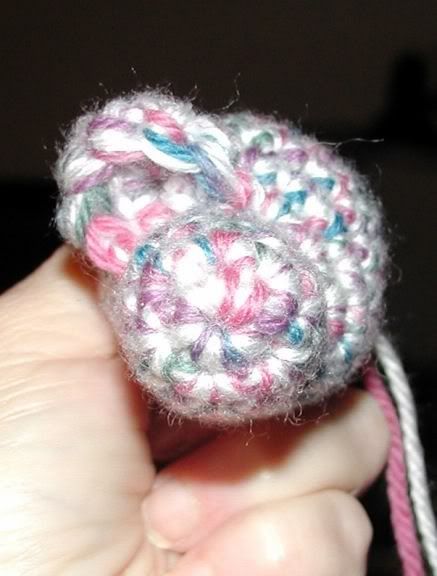
And sewing the second eye to the head:

Here I have both eyelids and eyeposts in place:

Now it's time to stuff the head:

And weave the ends of the yarn through the last row of stitches:
Pull tight, and make one or two stitches to lock into place.
Then weave the yarn down the back of the head to where it will attach to the neck:

Here's a side view of the head all sewn shut, with the yarn in place to sew the head to the neck of the dragon.
http://quizilla.teennick.com/user/MarjorieCrochets/journal/
Step One: Gather all the body parts.

Step Two: Assembling the head. Before I stuff the head and sew it to the body,
I sew the eyelids into place, and attach the eyeposts. Here I have one eyelid sewn to the head:

And sewing the second eye to the head:

Here I have both eyelids and eyeposts in place:

Now it's time to stuff the head:

And weave the ends of the yarn through the last row of stitches:

Pull tight, and make one or two stitches to lock into place.
Then weave the yarn down the back of the head to where it will attach to the neck:

Here's a side view of the head all sewn shut, with the yarn in place to sew the head to the neck of the dragon.

http://quizilla.teennick.com/user/MarjorieCrochets/journal/


-
-
28.07.2012 в 02:51