03:49


Программы для рукоделия

Составление схем вязания крючком


скачать читать дальше


@темы: create, хаотичное

05:13


Kikyo и базовая схема кукол из аниме Inuyasha, мальчика и девочки


Источник


@темы: амигуруми, create, куклы

08:36

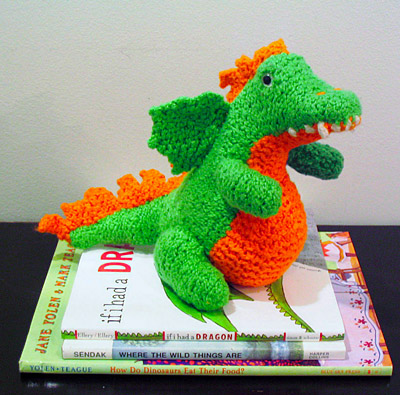
Tiny Dragon

Introduction

Last year I went to a sewing workshop and one woman there could not imagine what a crocheted dragon could look like. So, in the evening, I made her one.

Many thanks to snuffykin for proofreading and testing the pattern!

Materials List

yarn in two colors, appropriate hook, filling material. I used cotton with a 3mm hook.

Finished Size

Size depends on the yarn; mine is about 5cm (2inches) high.

Gauge

Gauge is not important for this project.

Notes

All pieces are stuffed while crocheting (except arms, ears and spikes which are not stuffed at all). All yarn ends are hidden by pulling them into the softie.

The Pattern

BODY AND HEAD (make 1)

Work in spiral rounds. Make increases and decreases evenly in a round.

Start with magic loop or ch2 and work sts of Round 1 in 1st ch.

Round 1: Sc 6.

Round 2: Sc 2 in each st around. 12sc

Round 3: Increase six sts. 18sc

Rounds 4 - 6: Sc in each st around. 18sc

Round 7: Decrease six sts. 12sc

Round 8: Decrease six sts. 6 sc

Start of Head. Note: It gets stuffed a little less than the Body and yes, the Head is larger than the Body.

Round 9: Sc 2 in each st around. 12sc

Round 10: Increase six sts. 18sc

Round 11: Increase six sts. 24sc

Rounds 12 - 15: Sc in each st around. 24sc

Round 16: Decrease six sts. 18sc

Round 17: Decrease six sts. 12sc

Round 18: Decrease six sts. 6sc

Fasten off, leaving a tail of a few centimeters. Thread tail onto yarn needle and insert yarn through top front loops of last 6 sts. Pull tail tight to close hole.

Nose / Snout: Take a piece of yarn and thread onto yarn needle. Weave yarn through the stitches on side of head. Work yarn in a path shaped like a circle or 0. Pull yarn tight to make the snout shape.

EAR (make 2)

Work as row.

Make slst into the head where the ear will be, ch2, dc into the same stitch as the slst.

Dc directly into the head at a slight angle from the first dc, slst into the same place.

ARM (make 2)

Work in rows.

Row 1: Work 2sc directly onto the side of body where the arm shall be.

Row 2: Ch1 for turning chain, sc 2.

Row 3 (Claw): Ch3, slst into the 2nd chain, slst into the 1st chain. Slst into the sc below in Row 2. Ch 3, slst into the 2nd chain, slst into the 1st chain. Slst into the row below.

LEG (make 2)

Start by working in rounds.

Round 1: Work 7sc in an ellipse shape, directly onto the base of body

Rounds 2 - 3: 7sc

Now make a row.

Row 1: (Sc together one stitch with the stitch from the opposite side) x 3.

Row 2 (Claw): (Ch3, slst across chs 3x, slst into row below) x 3.

TAIL (make 1)

Work in rounds.

Round 1: Work about 10sc directly onto the body in a circle shape.

Rounds 2 - 9: Sc2tog at the top of the tail.

SPIKES

Work in rows, starting at the head.

Row 1: Work 2 or 3 sc directly onto the body, turn.

Row 2: Ch1 for turning chain, sc2tog (or sc3tog), turn.

Row 3: Ch1 for turning chain, work slsts along edge to the end of the spike.

Repeat Rows 1-3, making spikes along the head, body and tail, varying the sizes of the spikes to taste.

EYES

Make a slip knot, cut yarn and draw through. Knot it into the face slightly slanted.


Filed under:


@темы: амигуруми, create, драконы

08:25


The Doubtful Guest.


The Doubtful Guest

Worsted weight yarn in black, white and red. (I used Caron Simply Soft)
G hook
Yarn needle
читать дальше


@темы: амигуруми, create

08:10


Knit a Marilyn Monroe doll

For a knitted doll that's out of the ordinary, try this Marilyn Monroe doll pattern.

By Carol Meldrum

Have you made this? Send your picture to [email protected]
and we'll post it in our photo gallery!

читать дальше
Wool Cotton by Rowan, approx 122 yd/50 g ball (50% wool/50% cotton): 1 ball in Ecru 900 (MC)
• Scraps of 4-ply cotton in black
• Pair of US 3 (3.25 mm) and US 7 (4.5 mm) needles
• Fibrefill
• Black embroidery thread
• Scrap of red felt

White dress:
• Scraps of 4-ply cotton in white (A)
• Old white T-shirt

Pattern
Doll

Using MC yarn, make a Basic Doll.
Face:
Use leftover black yarn to make eyes. Use red felt to create a mouth, making it slightly wider on one side.
Hair:
To create hair, cast on 6 sts. Using a looped knitting technique, stitch around the top and back of head.

White dress
Bodice:
Using US 3 (3.25 mm) needles and two strands of yarn A held together, cast on 26 sts.
Work 4 rows in St st.
Next row: Bind off 7 sts, k6, turn.
Slip rem stitches onto a stitch holder. Working on 6 sts only, work one row of purl.
Next row: Knit to last 3 sts, k2tog, k1. (5 sts)
Next row: Purl.
Next row: Knit to last 3 sts, k2tog, k1. (4 sts)
Next row: Purl.
Work a further 9 rows in St st.
Bind off.
Place sts back onto the needles, with WS facing, bind off 7 sts and purl to end of row.
Work rem sts to match first side, reversing all shapings. Sew back openings together and sew straps together to make a halter neck.
Skirt:
Cut a length of fabric from the bottom edge of T-shirt fabric approximately 4-7/8 ins (12 cm) deep and 22 ins (55 cm) long. Stitch 4-7/8-in (12-cm) edges together to form a tube.
Thread a sewing needle and work a running stitch all around the top edge approx. 1/8 in (0.5 cm) from edge.
Repeat this with a second round of running stitch approx. 3/8 in (1 cm) below the first.
Take the ends of the threads and pull to create a pleat effect.
Place skirt on doll, and when a snug fit is achieved, tie the threads together.
Pin bodice onto skirt and stitch into position.

http://www.canadianliving.com/crafts/kids_crafts/


@темы: амигуруми, create, куклы

08:07


Stone the Gargoyle

(from the Allie Beckstrom novels)
by Devon Monk

MATERIALS: читать дальше

Yarn: Ѕ skein worsted weight wool. (I used Patons Classic Wool Merino, dark gray)

Small amount white yarn (for teeth)

Small amount black yarn (for mouth and eyes)

Needles: US #4 double pointed needles (3.5 mm)

Gauge: Doesn’t matter, but you want a tight stitch so stuffing doesn’t show

Yarn needle

Polyfill stuffing

PATTERN ABBREVIATIONS:

BO: bind off

CO: cast on

K: knit

K2tog: knit two together

Kfb: knit into front and back of stitch

M1: make one stitch

P: purl

P2tog: purl two together

Pfb: purl into front and back of stitch

Ssk: slip two stitches as if to knit, then knit those two stitches together

Sl: slip one stitch


DIRECTIONS

BODY and HEAD:

Cast on 10 stitches, join in the round careful not to twist stitches

Round1: [kfb] in each st. 20 sts

Round 2: K all sts

Round 3: [k1, kfb] to end. 30 sts.

Round 4: K all sts.

Round 5: [k2, kfb] to end. 40 sts.

Rounds 6-7: K all sts.

Round 8: [k3, kfb] to end. 50 sts.

Round 9: K all sts.

Round 10: K all sts.

Round 11: [k4, kfb] to end. 60 sts

Round 12-15: K all sts

Round 16: [k4, k2tog] to end

Rounds17-18: K all sts

Round 19: [k3, k2tog] to end

Rounds 20-21: K to end

Round 22: [k2, k2tog] to end

Round 23-24: K all sts

Round 25: [k1, k2tog] to end

Round 26: [k2tog] to end. 10 sts

Round 27:[kfb] to end. 20 sts

Round 28: k to end

Round 29: [k1, kfb] to end

Round 30: K to end

Round 31: [k2, kfb] to end

Rounds 32-33: k all sts. 40 sts

Shape muzzle and nose. This is a little like turning the heel of a sock, and is worked on two needles:

Row 34: K6, kfb12 st, TURN

sl, p22, TURN

sl, k21, TURN

sl, p20, TURN

sl, k19, TURN

sl, p18, TURN

sl, k17, TURN

sl, p16, TURN

sl, [k2tog] 8 times

k25 to end


Working in the round again:

Round 35: K to end

Round 36: [K9, k2tog] six times, k23

Rounds 37-43: K to end

Round 44: [k1, k2tog] to end (k2tog @ end)

Round 45:[k1, k2tog] to end (k1 @ end)

Round 46: [k2tog] to end

Stuff body and head firmly, making sure to stuff snout. To make nose, thread yarn needle with body color and stitch a small circle between the “cheeks”. Think of a dog snout. You are making the nose on the top of the snout, in the center of the jowls.

For mouth, use black yarn in yarn needle. Stitch from “nose” to bottom edge of jowl, then from bottom of jowl to side of head. Repeat on the other side. This creates Stone’s wide mouth. For teeth, use white yarn in yarn needle and stitch single stitches from black “mouth” yarn.

EARS: (Knit flat. Make two)

Cast on 10 sts.

Row 1: K all sts.

Row 2: P. all sts.

Row 3: K all sts.

Row 4: P all sts

Row 5: K2tog, k6, k2tog

Row 6: P all sts

Row 7: K2tog, k4, k2tog

Row 8: P all sts

Row 9: K2tog, k2, k2tog

Row 10: P all sts

Row 11: K2tog, k2tog

Row 12: P all sts

Row 13: K2tog, bind off

LEGS: (make two)

Cast on 18. Join careful not to twist, and knit in the round:

Round 1-2: K all sts

Round 3: K12, ssk, k4

Round 4: K12, k2tog, k3

Round 5: K11, ssk, k3

Round 6: K11, k2tog, k2

Round 7: K10, ssk, k2

Round 8: K10, k2tog, k1

Round 9: K9, ssk, k1

Round 10: K9, k2tog

Round 11: K8, ssk (9 sts remain)

Round 12: K7, kfb, k1 (increase should be at the back of the “knee”)

Round 13: K all sts

Round 14: Kfb, k5, kfb, k3

Rounds 15-20: K all sts

Round 21: Kfb, k7, kfb, k3

Round 22-26: K all sts

Round 27: K3 on first needle, rearrange stitches onto two needles, 7 on each and work flat.

The next part is like making the heel of a sock. Work heel flap above the increases below the knee.

Row 1: S1, p6, TURN

Row 2: S1, k6, TURN

Row 3: S1, p6, TURN

Turning the heel:

Row 1: Sl, k6, TURN

Row 2: K7, TURN

Row 3: Sl, p6, TURN

Row 4: Sl, k5, TURN

Row 5: Sl, p4, TURN

Row 6: Sl k3, TURN

Row 7: Sl, p2, TURN

Row 8: Sl, k1, sl

Instep decreases: (begin working in the round again)

Round 1: K3 pick up 3 sts from left side of heel flap, k7, pick up 3 sts from right side of heel flap, k4

Round 2: K4, k2tog, k7, ssk, k5

Round 3: K3, k2tog, k7, ssk, k4

Round 4: k2, k2tog, k7, ssk, k3

FEET:

Rounds 1-6: K all sts

Round 7: K3 onto first needle. Divide sts evenly between 2 needles. Begin working flat.

Row 8: [K1 st from front needle and k1 st from back needle together] three times, K1 from back needle, K1 from front needle, [K1 st from front needle and k1 st from back needle together] three times.

Rows 9-12: K2, p2

BO using Picot edge bind off:

[Cast on 2sts, bind off 4sts] to end

Insert pipe cleaner (fold over & twist ends of pipe cleaner so it doesn’t poke out and scratch) stuff feet and legs leaving room at the knee so leg can bend. Weave in thread at “toe” end.

ARMS:

Right Arm:

CO 9 sts, join in the round careful not to twist.

Rounds 1-10: K all sts

Round 11. K6, TURN, sl, p5, TURN, sl, k4, TURN, sl, p3, TURN, sl, k2, TURN, sl, p1, Turn sl, k6

Rounds 12-22: K all sts

Round 23: k2tog, k2tog, k1, k2tog, k2tog.

Move all sts to one needle and begin to knit flat:

Row 24: p5

Row 25: k5

Row 26: p1, ml (I do this as pfb) kfb, p2, kfb

Row 27. [p2, k2] across

Row 28: [p2, k2] across

Row 29. [p2, k2] across

Row 30. [p2, k2] across

BO using Picot edge bind off:

[Cast on 2st, bind off 4sts] to end

Left Arm:

CO 9 sts, join in the round, careful not to twist.

Rounds 1-10: K all sts

Round 11: TURN, sl, p5,TURN, sl, k4, TURN, sl, p3, TURN, sl, K2, TURN, sl, p1, TURN, sl, k5 to end of round.

Rounds 12-22: K all sts

Round 23: k2tog, k2tog, k1, k2tog, k2tog.

Move all sts to one needle and begin to knit flat:

Row 24: p5

Row 25: k5

Row 26: p1, ml (I do this as pfb) kfb, p2, kfb

Row 27: [p2, k2] across

Row 28: [p2, k2] across

Row 29: [p2, k2] across

Row 30: [p2, k2] across

BO using Picot edge bind off:

[Cast on 2st, bind off 4sts] to end

Insert pipe cleaner (fold and twist ends so it doesn’t poke out or scratch) stuff, sew closed wrists, weave in thread at “finger” ends.

WINGS: (worked flat)

Right wing:

CO 35 st

Row 1: K15, p1, k9, p1, k9

Row 2: P9, k1, p9, k1, p15

Row 3: K2tog, k13, p1, k9, p1, k9

Row 4: P9, k1, p9, k1, p14

Row 5: K2tog, k12, p1, k9, p1, k9

Row 6: P9, k1, p9, k1, p13

Row 7: K2tog, k11, p1, k9, p1, k9

Row 8: P9, k1, p9, k1, p12

Row 9: K2tog, k10, p1, k9, p1, k9

Row 10: P9, k1, p9, k1, p11

Row 11: K2tog, k9, p1, k9, p1, k9

Row 12: P9, k1, p9, k1, p10

Row 13: K2tog, k8, p1, k9, p1, k9

Row 14: P9, k1, p9, k1, p9

Cut yarn, leaving 16 inch tail. Thread tail in yarn needle and pull thread through remaining stitches on needle. Pull tight (this puts the curl in the wing) bind off.

Left wing:

CO 35 sts

Row 1: P15, k1, p9, k1, p9

Row 2: K9, p1, k9, p1, k15

Row 3: P2tog, p13, k1, p9, k1, p9

Row 4: K9, p1, k9, p1, k14

Row 5: P2tog, p12, k1, p9, k1, p9

Row 6: K9, p1, k9, p1, k13

Row 7: P2tog, p11, k1, p9, k1, p9

Row 8: k9, p1, k9, p1, k12

Row 9: P2tog, p10, k1, p9, k1, p9

Row 10: k9, p1, k9, p1, k11

Row 11: P2tog, p9, k1, p9, k1, p9

Row 12: K9, p1, k9, p1, k10

Row 13: P2tog, p8, k1, p9, k1, p9

Row 14: K9, p1, k9, p1, k9

Cut yarn, leaving 16 inch tail. Thread tail in yarn needle and pull thread through remaining stitches on needle. Pull tight (this puts the curl in the wing) bind off.

ASSEMBLING YOUR GARGOYLE:

Ears–sew on sides of head facing “outward” with knit stitches facing inward. I think crooked is cuter.

Arms–sew at join of neck and body, making sure elbows bend outward and there is room for legs beneath.

Legs–sew on sides toward back of body, making sure “knee” is facing upward (so knee can bend) and feet are facing the front.

Wings–sew flat edge touching on back with knit stitches facing upward. You want the pearl stitches to show facing forward (when you’re looking at his face) so that the lines of his “wing bones” (row of knit stitches) shows.

Eyes–with black yarn, knit eyes above snout.

Weave in all ends.

And there you have it! Your very own Stone the Gargoyle, your buddy and protector against evil spirits and other spooky things that go bump in the night.

If you find errors in this pattern, please contact me and I will make corrections. I’d like to thank wingedkamui, whose “More Than a Fish, More Than a Man” pattern gave me the basis for the modified arms and legs for Stone.


@темы: амигуруми, create, драконы

07:41


Dragon

Pattern By: Betty Saxton & Luana Nelson
____________________________________________________
читать дальше


MATERIALS:
3 ozs. green
3-ply brushed acrylic yarn
1 oz of yellow
3 ply brushed acrylic- yarn
size F or 3.75 crochet hook (with finer weight yarn use size D [3.25] or E [3.5]
red, black, & white embroidery thread
two 4mm black beads (eyes)
one 1" wide silk flower
stuffing
yarn needle.

BACK AND TAIL:
Use green (or color of choice) yarn and start at the top of the neck.
Rnd 1: Ch 8, sc in second ch from hook and in remaining 6 ch. Ch 1 and turn.
Rnd 2-4: Sc in each sc across, ch 1 and turn.
Rnd 5: Sc in each sc across, increasing 3 evenly spaced across row, ch 1 and turn.
Rnd 6: Repeat Rnd 2.
Rnd 7,9,11,13,15: Sc in each sc across, increasing 2 evenly spaced across row, ch 1 and turn.
Rnd 8,10,12,14,16: Sc in each sc across, ch 1 and turn. At the end of Rnd 16 there should be 20 sc.
Rnd 17-20: Repeat rnd 2.
Rnd 21,22,23, and remaining uneven numbered rows to Rnd 55: Sc in each sc across decreasing 1 sc at the center of each row, ch 1 and turn.
Rnd 24 and remaining even numbered rows to Rnd 54: Sc in each sc across, ch 1 and turn.
At the end of Rnd 55, cut yarn leaving a length for sewing. Set piece aside.

BREASTPLATE:
Use yellow yarn and start at the top of the neck.
Rnd 1: Ch5, sc in second ch from hook and in next 3 ch. Ch 1 and turn.
Rnd 2-4: Sc in each sc, ch 1 and turn.
Rnd 5,7.9,11,13,15,17: Sc in each sc increasing 1 sc at the enter of the row. Ch 1 and turn.
Rnd 6,8,10,12,14,16,18: Sc in each sc across row, ch 1 and turn.
Rnd 19: Sc in sc 4 times, sc 2 sc together, sc in next 5 sc, ch 1 and turn.
Rnd 20: Sc in sc 3 times, sc 2 sc together 2 tims, sc in next 3 sc, ch 1 and turn.
Rnd 21: Sc in sc 2 times, sc 2 sc together 2 times, sc in next 2 sc, ch 1 and turn.
Rnd 22-26: Sc in each sc across row, decreasing 1 sc at the center of the row. Ch 1 and turn.
At the end of the 26th row, cut yarn. Holding the green and yellow neck edges together, sew one side together. Thread the length of green yarn from the tail tip through the yarn needle and sew the sides of the tail together up to the joining of the yellow breastplate. Stuff the tail firmly, using the opposite end of your crochet hook to get the stuffing down to the tip. Sew the other side of the breastplate closed, stuffing as you proceed. Set the body aside.

HEAD:
Use green yarn and begin at the front of the muzzle.
Rnd 1: Ch 3, make 4 sc in second ch from hook, and 4 sc in last ch. Join with a sl st in top of first sc made (this forms the nostrils).
Rnd 2: Sc in each sc around, join with a sl st. Ch 1 and turn.
Rnd 3-5: Sc in each sc around. Do not join rounds or turn.
Rnd 6: *(Sc in first sc, 2 sc in next sc), repeat from * 4 times (12 sc), do not join or turn.
Rnd 7: Sc in each sc around, do not join or turn.
Rnd 8: *(Sc in first 2 sc, 2 sc in next sc), repeat from * 4 times (16 sc), do not join or turn.
Rnd 9: Sc in each sc around. Sl st in next sc and cut yarn.

HEAD BACK:
Use green yarn
Rnd 1: Ch 2, 6 sc in second ch from hook. Do not join or turn.
Rnd 2: Make 2 sc in each sc around. Do not join or turn.
Rnd 3: *(Sc in first 2 sc, 2 sc in next sc), repeat from * 4 times (16 sc), Do not join or turn.
Rnd 4: Sc in each sc around. Sl st in next sc and cut yarn, leaving a 10" length. Make sure the nostrils are in a horizontal position and sew the two pieces together, leaving a 1" opening for the neck. Stuff the head and sew into position at the body neck opening.

BACKBONE RIDGE:
Attach the green yarn at the tip of the tail at the center top; sc in same space. Ch 3 and sl st in top of sc just made (picot made). Mark a straight line from this point up the center back to top of the head, and continue: insert hook and pull up a loop. In the next sp pull up another loop, and draw yarn through both loops. Continue all the way up the back to the top of the head, making a picot every other stitch. At the top of the head make a sl st and cut yarn.

EARS:
At the top of the head on each side of a picot, insert the hook and attach green yarn. Ch 2, dc in same sp, ch 2, sl st in same sp. Secure with a tiny stitch using a yarn needle and weave in the ends.

LEGS:
Use green yarn.
Rnd 1: Ch 2, 6 sc in second ch from hook. Join with a sl st and ch 1. Do not turn.
Rnd 2: Make 2 sc in each sc around (12sc). Join with a sl at in back loop of beg sc, ch 1, do not turn.
Rnd 3:: In back loop only, sc in each sc around. Join with a sl st, ch 1 and turn.
Rnd 4-6: Sc in each sc around, do not join or turn.
Rnd 7: Sc in next 6 sc, ch 1 and turn.
Rnd 8: Sc 2 sc together 3 times. Cut yarn leaving a 10" length. Stuff the back leg and sew to the body, positioning the long side of the leg toward the backbone (the back legs are positioned at the widest part of the underbelly.

TOES:
Attach yarn in the outer loop of Rnd 2 on the foot. Make 8 sc across the front of the foot with a picot in every other sc (see instructions for making a picot in Backbone Ridge, above).

ARMS:
Use green yarn.
Rnd 1: Ch 2, 6 sc in second ch from hook. Do not join or turn.
Rnd 2: Sc in each sc around, increasing 2 evenly around to make 8 sc. Do not turn or join.
Rnd 3-6: Sc in each sc around. Do not join or turn.
Rnd 7: Sc in first 4 sc, ch 1 and turn.
Rnd 8: Sc 2 sc together 2 times. Cut yarn leaving an 8" length. Stuff the arm and sew it to the body where the back and breastplate join, 1" from head. Make sure the long side of the arm is positioned toward the backbone.

FINGERS:
Pinch the end of the arm flat and pick up 4 sc at the end of the arm, making a picot in each sc.

FINISHING:
For the hair, cut 6 strands of green yarn about 2" long and attach each strand separately with a tufting stitch on the top of the head (insert the hook through a sc of the head and pull up a 1 1/2" loop, then catch both ends of yarn and pull snugly through the loop). Separate the strands of yarn and brush lightly. Trim ends.

FACE:
With 3 strands of white embroidery thread, satin stitch small white circles for eyes and 2 small teeth on the lower front of the muzzle. With 2 strands of black thread backstitch around the eye whites and make 5 short stitches for eyelashes. Sew on the black beads at the bottom of the white circles. With red thread backstitch the mouth from the center side of the muzzle and over the teeth to the center of the other side of the muzzle. Make a french knot in each nostril. Bring the arms together and sew in the silk flower.

HINT:
If your dragon won't sit upright, secure a piece of yarn inside the tail, bring it up the backbone (on the inside) and pull the thread to slightly curl the tail until the dragon sits, secure and cut the yarn.

___________________________________________________________

Back To Crochet Index


@темы: амигуруми, create, драконы

05:34


Please feel free to use and share the link to this pattern.
However, please do not re-post the pattern on your own blog.
читать дальше


The Cute Ninja from Little Gamers (Crochet)

I used a worsted-weight yarn (I think it was Red Heart Super Saver, but I can’t be sure. It was just some black scrap yarn that was floating around the house) and a 4.0mm crochet hook. My little guy is about 6 inches tall.

*I’m writing this pattern down from memory, so please let me know if there are any problems/mistakes.

**Changes were made to the pattern on 13 February 2008.**

**Sorry! I'm reverting back to the original pattern! I had a lot of trouble with Cute Ninja Version 2.0 (the size of his head), and I tried out several different things, but turns out the original pattern was correct. The changes (back to the original) are made in dark purple. Apologies for the confusion! 13 February 2008.**

Each piece is worked in the round without joining rows. Use a stitch marker to mark the beginning of the row in order to keep track of your rows.


HEAD:
Starting chain: Ch 2.
Row 1: 6 sc in 2nd ch from hook.
Row 2: 2 sc in each sc - 12 sc.
Row 3: *2 sc in next sc, 1 sc in next sc* - 18 sc.
Row 4: *2 sc in next sc, 1 sc in next 2 sc* - 24 sc.
Row 5: *2 sc in next sc, 1 sc in next 3 sc* - 30 sc.
Row 6-11: Sc around.
Row 12: *Sc2tog in next sc, 1 sc in next 3 sc* - 24 sc.
Row 13: *Sc2tog in next sc, 1 sc in next 2 sc* - 18 sc.
Row 14: *Sc2tog in next sc, 1 sc in next sc* - 12 sc. Bind off. There will be a small opening to allow stuffing.

FACE:
Using white or flesh colored yarn, ch 5.
Row 1: 2 sc in back loop of 2nd ch from hook. Sc in back look of next 2 sc. 2 sc in back loop of next sc. 2 sc in front loop of next sc. Sc in front loop of next 2 sc. 2 sc in front loop of next sc. 12 sc.
Row 2: 2 sc in next 2 sc. Sc in next 4 sc. 2 sc in next 2 sc. Sc in next 4 sc. 2 sc in next 2 sc. 16 sc. Bind off.
*With black yarn, sew eyes onto the ninja mask. You can make the eyes normal circles. I made mine in a “fighting stance” mode, but he looks more constipated than anything else! See samples.

BODY:
Starting chain: Ch 18 and join last ch to first chain with sl st, being careful not to twist.
Row 1: Sc around.
Row 2: *2sc in next sc, 1 sc in next 8 sc* - 20 sc.
Row 3: Sc around.
Row 4: *2sc in next sc, 1 sc in next 9 sc* - 22 sc.
Row 5-10: Sc around. Bind off.

ARMS (Make 2):
Starting chain: Ch 2.
Row 1: 6 sc in 2nd ch from hook.
Row 2: 2 sc in each sc - 12 sc.
Row 3: Sc around.
Row 4: Sc2tog around - 6 sc.
Row 5-6: Sc around.
Row 7: Sc in next 3 sc.
Row 8-10: TURN. Sc in each sc - 3 sc.
Row 11: TURN. Sc in each sc. Bind off.

FEET (Make 2):
Starting chain: Ch 5.
Row 1: 2 sc in back loop of 2nd ch from hook. Sc in back look of next 2 sc. 2 sc in back loop of next sc. 2 sc in front loop of next sc. Sc in front loop of next 2 sc. 2 sc in front loop of next sc. 12 sc.
Row 2: 2 sc in next 2 sc. Sc in next 4 sc. 2 sc in next 2 sc. Sc in next 4 sc. 2 sc in next 2 sc. 16 sc.
Row 3: Sc around in back loop only.
Row 4: Sc2tog. Sc in next 4 sc. Sc2tog twice. Sc in next 6 sc. 13 sc.
Row 5: Sc2tog. Sc in next 3 sc. Sc2tog twice. Sc in next 4 sc. 10 sc.
Row 6-7: Sc around. Bind off, leaving a long tail to sew foot to body.

FINISHING:
Sew pieces together. You may want to sew the mask portion onto the head before stuffing the head. You may leave the arms unstuffed or stuff them for more definition. When you sew the feet on, sew the bottom row of the body onto the second or third row of the feet, shoving the feet into the body cavity a bit to create a bit of distinction between the body and the feet. In order to hide the last bit of stuffing that will peek through between the legs, sew the front of that area to the back.

Finally, for the little “notch” on the top of the ninja’s head, ch 2 and 2 sc in 2nd chain from hook. Bind off and tie the little notch to the top of the ninja. This also helps to conceal the little hole you may have at the top.


@темы: амигуруми, create, куклы

05:17 

Доступ к записи ограничен

Закрытая запись, не предназначенная для публичного просмотра

05:00 

Доступ к записи ограничен

Закрытая запись, не предназначенная для публичного просмотра

04:51 

Доступ к записи ограничен

Закрытая запись, не предназначенная для публичного просмотра

04:36 

Доступ к записи ограничен

Закрытая запись, не предназначенная для публичного просмотра

04:24 

Доступ к записи ограничен

Закрытая запись, не предназначенная для публичного просмотра

03:59

03:48


Ayame The Snake


читать дальше


@темы: амигуруми, create

03:40 

Доступ к записи ограничен

Закрытая запись, не предназначенная для публичного просмотра

03:29 

Доступ к записи ограничен

Закрытая запись, не предназначенная для публичного просмотра

03:03 

Доступ к записи ограничен

Закрытая запись, не предназначенная для публичного просмотра

02:56 

Доступ к записи ограничен

Закрытая запись, не предназначенная для публичного просмотра

02:51 

Доступ к записи ограничен

Закрытая запись, не предназначенная для публичного просмотра